The entry way needed a little roof over it, both for practical and aesthetic reasons. The challenge was to get the roof to look rounded, when it actually consists of straight angles.

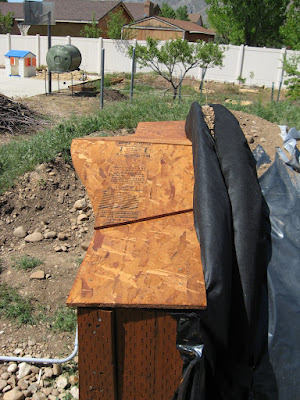
I cut the two middle pieces so that they would jut out further than the sides, and gave them a curved line using the jigsaw.

Here is a top angle view. You cans see the rounded look to the roof line. You can also see more of my cludge waterproofing/drainage work here. The wood piece abutting the pipe is wrapped in black plastic and landscaping fabric, and behind it, laying on the edge of the pipe, is more drainage pipe, wrapped in landscape fabric, to help take water away from this seam. It may have invented my own method, but I know it works, because I ran a hose all over this full blast for 15 minutes, and there are no leaks underneath.
Here is another angle on it. It is starting to look more and more hobbit-like.

This turned out to be the only shot I took of the shingled roof before I mostly buried it with dirt (see next post). You can see the flashing and the shingles. With the shingles on there, it really gives it more of a rounded look. I later put more flashing along the seam between the roof and the veritcal piece, and took the flashing up and over the lip (top) of that verticle piece. Later, I will paint the flashing with some earthtonee, so it doesn't stand out so much, shining in the sun.
.JPG)
 I cut the two middle pieces so that they would jut out further than the sides, and gave them a curved line using the jigsaw.
 Here is a top angle view. You cans see the rounded look to the roof line. You can also see more of my cludge waterproofing/drainage work here. The wood piece abutting the pipe is wrapped in black plastic and landscaping fabric, and behind it, laying on the edge of the pipe, is more drainage pipe, wrapped in landscape fabric, to help take water away from this seam. It may have invented my own method, but I know it works, because I ran a hose all over this full blast for 15 minutes, and there are no leaks underneath.
 Here is another angle on it. It is starting to look more and more hobbit-like.
 This turned out to be the only shot I took of the shingled roof before I mostly buried it with dirt (see next post). You can see the flashing and the shingles. With the shingles on there, it really gives it more of a rounded look. I later put more flashing along the seam between the roof and the veritcal piece, and took the flashing up and over the lip (top) of that verticle piece. Later, I will paint the flashing with some earthtonee, so it doesn't stand out so much, shining in the sun.
.JPG)
No comments:
Post a Comment