A hobbit-hole in my backyard? It may sound crazy, but I can tell you that my kids love it. It is the coolest playhouse ever. Plus, they can enjoy the grassy hill for sledding in winter and water sliding in summer. This was all my wife's idea. She dreamt it, and I got to be the one to bring it to reality. I'm not a construction expert; this was a total do-it-yourself job by a complete amateur. It has turned out rather nicely, I think. Here is the story of how it came to be.

Since this is in blog format, the posts are in order from newest to oldest. To read this in chronological order, start with How it all Began and use the "Newer Post" links. Or click on the links under Blog Archive, in order.

Sunday, November 15, 2009

Stucco on the Front Wall

Now that the back wall is done, I am returning to the front. I finally have weatherproofed the facade, by stuccoing over the front wall. Now I am debating whether to stain it (and the back wall) a more terra-cotta color, or just leave the grey, which looks rather nice as it is. I also finished under the eaves, and installed air vents.


Saturday, October 10, 2009

Photos of the Back Wall
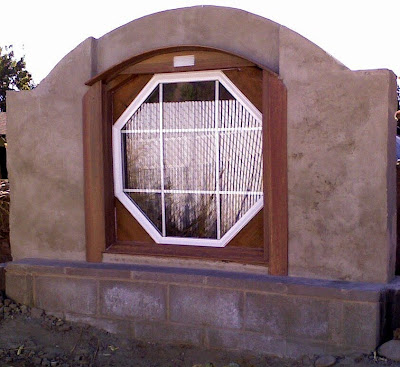
Finally, I have some new pictures to share. I have been stingy with pictures this year, because I have been doing more deconstructing than building--until now. Unfortunately, my camera is at the shop, so these are taken from my phone.

I must say, I am rather proud of how this wall has turned out. The first two pictures show it in its nearly final form, from a couple of angles. Some of the clear caulk is still drying, and I have a couple of small gaps still to fill, but it is 95% there.


Below is how the wall looked just after removing the concrete form. The window frame was unfinished and the wall was very rough with large gaps and pock marks all over. Using a product called Cement All, I was able to not only fill in the gaps and blemishes, but give the whole wall a stuccoed look that you see in the pictures above.

Here is the wall before I removed the form.
I was able to re-use almost all of the wood from the previous incarnation of the wall to build the form. The form itself was probably harder than anything else to build. It was quite tricky trying to figure out how to do it in such away that would result in an attractive wall, be structurally sound, and also enable me to get the concrete poured in evenly. I had to pour and build the form as I went up. It was actually done in two pours, the first up to about 3 inches above the cinder-block wall, and then the rest a couple of weeks later--this past weekend in fact. The last pour was in two stages while the cement was still wet. First, I poured up to about the height of the window, with the upper part of the form removed. Then I hurried and build the upper part of the form and kept pouring--building the form as I went up, until I poured the last bit through a square hole at the top of the form.


Tuesday, October 6, 2009

Progress

I need to get the pics up, but I am happy to report that I have completed construction of the concrete wall in the back. No more leaks! I feel victorious. I actually poured the wall in two pours, one a few weeks ago, and the second this past weekend. There is literally more than a ton of concrete in the wall, which is at least 9 inches thick, someplaces thicker. I haven't removed the form yet, as I have been waiting for the concrete to harden up. I will get some pictures taken before and after I take the form off. The form itself was quite a job to construct. Luckily, I was able to recycle nearly all of the material from the former war to use in construction of the form.

I nearly had a disaster during the construction. As I was filling the forms with concrete, and the weight increased, part of the form started to bow out, creating a seam from which some concrete was starting to leak out. As the pressure increased, the bowing grew larger. I was afraid the form would collapse and I would have an avalanche of concrete on my hands. What a huge mess that would have been! I'm afraid if that had happened, I may have taken dynamite to the whole project. Luckily, my 8-year-old son alerted me to the problem before it got too bad, and we were able to scramble and shore up the form with a couple of two by fours and a bunch of screws . We were able to close the gap and shore up the form, and only lost a couple of handfuls of concrete. As a kind of a cool side benefit, the forms stayed a little bowed out, making the wall have a bit of a rounded shape. That would be terrible if we were building most any other structure, but for a hobbit-hole, roundness is a good thing!

Monday, July 13, 2009

The Hydra

You know the beast from Greek mythology? The one that, when one head was cut off, would grow back two? Well, that is what this hobbit-hole project was starting to feel like. I reported in my last post that I had fixed the leak. Well that was true, but the next time it rained hard, there were more leaks, and so I have taken drastic measures. I realized that the structure of the back wall was fundamentally flawed. I had built it in haste at the end of last year, trying to get it done before the snows began. I took a couple of shortcuts, hoping that it would work OK and, well, you know the rest. So, I have torn down the back wall. Yep, gone, except for the low cinder-block retaining wall, which I have kept for looks. And its a good thing, too, because the wood structure had begun to rot due to all the leakage that had been happening over the winter and wet spring. If I had let that go, then the whole interior could have been contaminated with mold eventually. As it is, the bad stuff is gone, and the interior is not damaged. The hydro-hydra is vanquished. Well, sort of. Instead of a leaky wall, I now have no wall.

My new plan? I'm not going to mess around this time. I'm going to use concrete--just like they usually do when dealing with culvert pipes under highways and such. I'm building a form for a 10-inch thick concrete retaining wall to cover the back wall and extend beyond it to hold up the future hill around it. The form will include an opening for the window and ventilation. This will be reinforced with some rebar. Yes, it will be ugly and un-hobbitlike at first, but don't worry, I will make it round on top and cover it up with a nice façade so it won't look like a culvert.

If only I had thought of this method in the first place! Oh well. Live and learn. That's what you get when you are an amateur taking on a job like this. Not to worry, though. After all, Bilbo and Frodo were amateurs too, when they first set out on their adventures.

Sunday, June 14, 2009

Rain, Rain, Go Away

This has been an unusually wet year.  I actually love rain, and wish that it would rain where I live more often than it normally does.  But when it comes to the hobbit-hole right now, rain is not so good.  It really puts a damper on working on it--at least on the part that I need to work on right now, which is the outside.  But there is some good news: I have plugged the leak!  One thing about all this rain is that it has given me lots of opportunities to test whether the measures I have been taking are working.  Yesterday morning it had dried out enough that I was able to put some finishing touches on the repairs.  It has rained a lot off and on since then, soaking everything pretty good, but the hobbit-hole is nice and dry, which is a good thing, because, after all, a hobbit-hole is not a nasty, dirty, wet hole, filled with the ends of worms and an oozy smell.  No--a hobbit-hole means comfort!

Saturday, May 16, 2009

Where is Sam Gamgee when I need him?

I need a gardener.  Spring has finally come, and so have the weeds.  At least it has stopped raining on my Saturdays!  I actually was able to work on it today, and made some really good progress on shoring up the northeast corner.  I'll get the leak fixed, then I can worry about trimming the verge.

Wednesday, May 13, 2009

Thank you for your support!

Thank you for all of your comments.  I am so happy to hear that the hobbit-hole is inspiring people, and even helping to bring family members closer. I had no idea that it could have that kind of impact. I really feel motivated to keep going with it thanks to all of your encouraging comments.  The weather has been wonderful--now if I can just get over this darn cold!  

Sunday, May 3, 2009

Another Saturday, Another Storm

We are stuck in a cycle: sunny six days, then rain.  In general, I enjoy the occasional rainstorm.  The only problem is that the rainy days lately have all fallen on my Saturdays.  This weekend, I did manage to fix a leak, but it wasn't the hobbit-hole leak; it was the dripping faucet in the bathtub.  Yet that little success at stopping water has given me added confidence.  I can tell water where to go (or where not to)!  After striking that off the honey-do list, I decided to embrace all the wetness and do something very un-hobbit-like: I took the kids swimming. 

Saturday, April 25, 2009

The Long Winter is Over

I want to thank everyone who has been sending me words of encouragement over the last few months.  It has really helped me to feel motivated to finish this project, which has turned out to be a bigger job than I thought it would be.  We finally had a week of real spring and sunshine this week.  Unfortunately, I was stuck at work all week and had a lot of other things on the calendar that prevented me from doing any more work on the project.  Now I have a Saturday, and it is raining again, which brings me to the other problem: the hobbit-hole has a leak.  

This has been very discouraging and rather demotivating, compounded by the fact that we have had so much rain and snow that I have been constantly reminded of it, without being able to do anything about it.  It isn't a horrible leak--only a trickle--and only occurs when the rain and snow are particularly heavy; but it is enough that I would wind up with a major problem over time if I don't fix it.  

It is totally my own fault--a result of being too hasty! (A lesson which I ought to have learned from Treebeard). The good news is that it is totally fixable--and is not some defect in the structure of the pipe.  I have identified the source of the leak, and have determined how to fix it (or rather them--there are two spots).  In fact, I did manage to fix one of them already, in fits and spurts during March .  I just need the stars (or the sun and clouds) to align again so that I can fix the other side.  It would have been nice if the leaks had been somewhere above ground; but no, they have been down at the foundation, where the pipe meets the wall, so I had to dismantle the retaining walls on the two corners (the back side of the hole) and dig out all the dirt to expose the spots. (There are few things more discouraging than having to tear down something you have already built and do it over.)

Looking back now, I can see how I could have totally avoided this problem.  I just got over-excited about getting the back wall completed, and underestimated water's ability to penetrate through rock and dirt and squeeze through small cracks--even buried cracks.  I said I was an amateur at this, and this proves it.  But all is not lost.  

Hope remains while the Fellowship is true!

Friday, January 30, 2009

Hobbit-hole in Winter


Buried in Snow

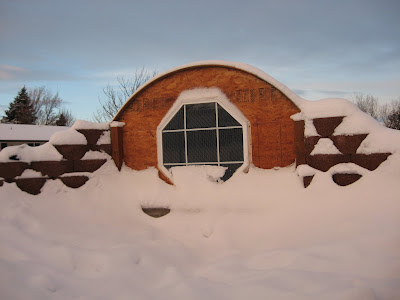
It has been so snowy this winter (22 year record) that I haven't gotten any work done on the hobbit-hole. I couldn't even get any pictures taken of the completed retaining walls before everything was buried. You can see the ones on the far side here, their tops sticking up above the snow. I hope I have at least built all this to withstand the first winter. Next spring, I will finish the exterior with some brick and stucco, so that it isn't just OSB with generous amounts of caulking and wood sealant.

Sledding on the Hobbit-hole!

The kids couldn't wait for a proper snowfall; a couple of inches was enough for them. The first skiff of snow, and they were all over the hobbit-hole on their sleds. This was back in mid-December. Earlier in the day, it had been warm enough for me to work outside without a coat. I was frantically working on some last minute winterization measures, knowing this storm was coming. As the snow began to fall; I hurriedly tossed a thin layer of dirt up onto the pipe so that the snow would stick and the kids would have a halfway-decent slope to sled down. The kids all watched with excitement as I froze my buns off shoveling dirt, and as the snow began to accumulate. No sooner did we have enough snow to hide all the dirt, then they were all out there lining up to sled down; and they didn't come in for 3 hours! It doesn't take a very big hill to make it a ton of fun for the kids. And they didn't care that the dirt was loose and got mixed with the snow. As long as they had a fairly smooth track to go down, they were willing to put up with the difficult slog back up. More recently, we have had a ton more snow, and the kids have been out there sledding time and again. I can't wait until we have it properly covered with more dirt, and with sod!

Custom Search