 This is actually two layers of OSB. You may recall that the pipe is not totally level. To compensate for this, the two layers of OSB are in a narrow V shape. They are connected flush at the bottom, but taper out until they are about 2 inches apart at the top. So the inner layer is flush with the pipe opening, which is no level, while the outer later is level. The inner layer is also covered with heavy duty black pastic to weather proof it against the dirt, which will come right up against it.
Saturday, October 25, 2008
Rear wall
The rear wall starts to take shape, starting with OSB cut to cover the entrance, with a hole for the window.
 This is actually two layers of OSB. You may recall that the pipe is not totally level. To compensate for this, the two layers of OSB are in a narrow V shape. They are connected flush at the bottom, but taper out until they are about 2 inches apart at the top. So the inner layer is flush with the pipe opening, which is no level, while the outer later is level. The inner layer is also covered with heavy duty black pastic to weather proof it against the dirt, which will come right up against it.
This is actually two layers of OSB. You may recall that the pipe is not totally level. To compensate for this, the two layers of OSB are in a narrow V shape. They are connected flush at the bottom, but taper out until they are about 2 inches apart at the top. So the inner layer is flush with the pipe opening, which is no level, while the outer later is level. The inner layer is also covered with heavy duty black pastic to weather proof it against the dirt, which will come right up against it.
Starting on the back wall
Now that the front is far enough along that it can withstand the winter, I'm starting on the back. As I did with the front, I poured a foundation for the rear wall.


Sunday, September 28, 2008
Weatherproofing the Entrance
I am anxious to start on the back wall, but first I needed to get the entrance far enough along that it could survive the winter--in case I run out of time before it starts to snow. I finished building out the wall on the left and right sides, so there is no longer a gap, then I sealed all the seams and cracks and stained it all. This is not the completed entrance, but it should be good enough to make it through the winter, just in case. Now I am turning my attention to the back wall, which will include a large window. Once the back is done enough to be at least weatherproof, I can get the dirt put on top of the tube. Then it will be down to finish work on the exterior and interior.
 Here is another angle on the entrance. I may be giving away my location here, for those familiar with that mountain. ;)
 Here is a bird's eye view, taken from up in the cherry tree. I can't wait until I can cover up that unsightly tube!
 Maybe in my next post, I will include some people, so you can get a better idea of the scale of this. The tube is 6 feet diameter and 15 feet long, which should give some idea. I have to duck pretty low to enter, as the door itself is only a little more than 4 feet in diameter.
 Here is another angle on the entrance. I may be giving away my location here, for those familiar with that mountain. ;)
  Here is a bird's eye view, taken from up in the cherry tree. I can't wait until I can cover up that unsightly tube!
 Maybe in my next post, I will include some people, so you can get a better idea of the scale of this. The tube is 6 feet diameter and 15 feet long, which should give some idea. I have to duck pretty low to enter, as the door itself is only a little more than 4 feet in diameter.
A Couple of More Looks
Here are a couple of more looks at the interior as it stands now.
Looking toward the front...

... and toward the back.
 Obviously, the ribwork to support the interior, rounded walls is not complete. I only have it installed on the left side of the entry, as you come in. It will be installed throughout eventually.
Looking toward the front...

... and toward the back.
 Obviously, the ribwork to support the interior, rounded walls is not complete. I only have it installed on the left side of the entry, as you come in. It will be installed throughout eventually.
A Peek Inside
I finally have some progress to show on the inside of the hobbit-hole for a change. Here you can see where I have installed that interior partion wall that I built a few weeks ago. Notice how it separates the space into two "rooms". I am sitting down on the floor in the second room (the parlor), which is larger than the first (the entry).
I have another piece of wall going in later that will cover up the studs and wiring. And of course, I will finish the wall surface off nicely so that it looks really cool, rather than that ugly OSB.
You can also see the horizontal boards running along the inside of the tube, like ribs. I will be attaching flexible wood paneling to this ribwork, so that the round walls have a wooden look, rather than corregated metal. Herein lies another reason for the interior partition wall: it also serves as a key support to the rib structure. (And the rib struture in turns gives more support to the partion wall.)

Here is a closer look, showing the ribwork and also the beginnings of a built-in bench. The bench was an immediate hit, not only for the kids, but for myself and other adults wanting to check out the place. It is sooo nice to have a place to sit down in there, especially for those of us with stature more resembling a wizard than a hobbit.
Of course, this will all be finished off nicely with wood to cover up the studs, wiring, corregated metal, etc. Also, I will be working on the doorway, so that it looks nicer, and so the studs are not exposed. I have a nice floor covering planned as well.

Wednesday, September 17, 2008
Extending the patio
Every time I work on this project, I get less done that I plan. This time, I only managed to add another row to the patio. It will eventually extend out as far as the sand there. Those are chunks from an old concrete pad that my brother-in-law got rid of. Man those things are heavy! I also am toying with the idea of having steps lead up the hill to the left. I put three there just to remind me. I think I will need to reposition them a bit later. The kids think the stairs idea is awesome.


Wiring for the lights and fixture
You may wonder what this is. Well, hopefully later pictures will make it more clear, but I will try to explain. Inside the hobbit-hole right now, there is nothing but a 4-foot wide by 15 foot long floor in what is otherwise an empty corrugated metal pipe. In order to get lighting in there, and also to separate the space inside into two "rooms" I am building a rounded partition wall, to be placed a little short of half-way in the pipe. There will be no door in this wall, only an opening. The first "room" will be like an entry, with a bench, and hooks for walking sticks and pointy hats and such. The second "room" will be sort of a parlor, with places to sit, and probably a small table.
Wiring from the outside will pass through the front of the hobbit-hole and run hidden under a bench/shelf that I will build on the left side as you enter. From there it will run into this partition wall. You can see the guts of that wall, pre-assembled here. I have wired it for a fixture and four lights (only two boxes for lights are visible; the other two are on the opposite side. This way, both rooms will be lit with two light fixtures. They will be old fashioned looking--reminiscent of old lanterns, to be more consistent with a real hobbit-hole (which of course has no electricity).
This is just about ready to haul out and install in the hobbit-hole. It will be a tight fit, and will take a bit of clever maneuvering to get in place, but I have done a dry run, so I know it will work.

Saturday, July 12, 2008
"... a perfectly round door ..., painted green..."
It finally cooled down to the 80s, so after a 3-week hiatus, I finally made some more progress. Today, I painted the door green, put a brass door knob in the middle, and attached the pre-constructed (by me), round door jamb/threshold. This not only adds some dimension to the door, but it also ensures that it won't swing outward. (There is a gap on either side which I will fill in. The threshold structure itself wasn't wide enough to cover the full space. I just needed it to be wide enough to accomodate the doorway.)

Below is what the door looked like right after I painted it this morning, and before attaching the threshold. The last time I worked on it, I had added a stud on the left, flush with the door, and installed a ball latch, so the door will shut and stay shut, but can be simply pushed open with a little shove (or pulled open with a little tug from the inside.)


Below is what the door looked like right after I painted it this morning, and before attaching the threshold. The last time I worked on it, I had added a stud on the left, flush with the door, and installed a ball latch, so the door will shut and stay shut, but can be simply pushed open with a little shove (or pulled open with a little tug from the inside.)

Sunday, July 6, 2008
Best & Worst of Middle Earth
I'm starting a list of the best and worst of Middle Earth, which I will keep posted in the left sidebar on this blog. Please comment if you have more best and worst suggestions.
Out of the Frying Pan and Into the Fire
As I mentioned in my last post, this is the chapter I just read to my boys from The Hobbit. It also is an apt description of the weather for the past 3 weeks. After an early spring, and a cool May and early June, it suddenly jumped up to 100+ degrees and has stayed there for weeks. So, I'm afraid I have not made any progress on the hobbit-hole. It is hard to feel motivated to work on it when it feels more like the slopes of Mt. Doom than The Shire.
(It finally cooled down today, so I hope to be able to get back to work on it this week.)
(It finally cooled down today, so I hope to be able to get back to work on it this week.)
Tuesday, July 1, 2008
Happiness is...
... reading The Hobbit to your 5 and 7 year old sons inside of their very-own hobbit-hole.
The other night, I slept out in the hobbit-hole with my two older boys. We stayed up late reading from the chapter, "Out of the Frying-Pan and into the Fire", when the eagles save Bilbo, Gandalf, and the Dwarves from the goblins and wolves (wargs). Although the hobbit-hole is far from finished, it was still a lot of fun to spend the night in there. Even without the back wall, and with the door only partially done, it is dry and comfortable. It is just wide enough for two adults or one adult and two small children, to lay there with their sleeping bags. It is long enough that we could fit six of us in there, three on one end and three on the other. The only trouble is that we get strong canyon winds, so without the wall and door finished, it was pretty loud. Although we were protected from the wind itself, the noise of the wind in the trees outside was bothersome. I look forward to finishing it, because it will be pretty quiet in there once it is done.
The other night, I slept out in the hobbit-hole with my two older boys. We stayed up late reading from the chapter, "Out of the Frying-Pan and into the Fire", when the eagles save Bilbo, Gandalf, and the Dwarves from the goblins and wolves (wargs). Although the hobbit-hole is far from finished, it was still a lot of fun to spend the night in there. Even without the back wall, and with the door only partially done, it is dry and comfortable. It is just wide enough for two adults or one adult and two small children, to lay there with their sleeping bags. It is long enough that we could fit six of us in there, three on one end and three on the other. The only trouble is that we get strong canyon winds, so without the wall and door finished, it was pretty loud. Although we were protected from the wind itself, the noise of the wind in the trees outside was bothersome. I look forward to finishing it, because it will be pretty quiet in there once it is done.
Sunday, June 22, 2008
The Door Takes Shape (Round, of Course)
I am finally getting to the most characteristic part of the hobbit-hole (aside from being under ground): the round door. Actually, truth be told, it is not going to be a fully round door. To make the door a complete circle would be an engineering feat. It is possible, but it would require that I spend a lot more money on a very large, specialized hinge. I decided to go a simpler route, and make a mostly round door, in sort of a "D" shape, but finish it out round to create the illusion of a full circle.
 Above, you can see the same, where the hinges are located. Below, you can see how it opens inward. Once I paint it green, and put in some weatherstripping (also painted green), in the seem, it will look pretty seamless, like a fully round door when closed.

 Above, you can see the same, where the hinges are located. Below, you can see how it opens inward. Once I paint it green, and put in some weatherstripping (also painted green), in the seem, it will look pretty seamless, like a fully round door when closed.
The next step is to frame in the left side and install a ball latch, so the door will shut and stay shut. Then I will prime it, paint it, and put on a brass doorknob in the middle. Then I will build out from there to create a door jamb, and a recessed look to the door.
With this much of the door completed, the kids excitement about the project more than doubled. The door, I guess, even unfinished, makes it seem that much more real to them. Since I built this, they have slept out in the hobbit-hole in their sleeping bags 5 times (in less than 2 weeks).
Monday, June 2, 2008
Looking Good, But Far From Finished
At this point, I am starting to feel a little bit like Frodo, or rather Sam did, at the Last Homely House in Rivendell. He thought that after their long journey to bring the ring to Lord Elrond's house, their part in the quest was done, and they could go home. Little did he know that their adventure had just begun. This is really starting to look like a hobbit-hole, but I'm afraid I'm not even half-way finished with it yet. My goal is to get this to look good enough to be mistaken for a real hobbit-hole in the shire.
 What's new since my last post? I finished the flashing on the roof, and went ahead and put some dirt up there, just to get a little bit of a sense of what is to come. Ultimately, of course, all that dirt around will be up on top of the pipe, completely hiding it. The hill will come right down onto the roof, and there will be grass growing all over it.
Other changes include shingles down the sides. These sides will be mostly covered with dirt. They needed to be waterproof as well, but also the parts that stick out from the hillside needed to look nice. I hope this will do the trick.
I started building out the patio, using chunks from an old concrete slab that my brother-in-law tore up from his yard. These things weigh a ton, and he and I carted about fify of them to my place in a tiny pickup truck with a rickety wood trailer. (I'm surprised the truck and trailer axles didn't break.) They have been piled up on my back patio for over a year and now I finally have a use for at least some of them. I'm going to build the patio out several feet, and also extended it a little to the right. The cracks will be filled with topsoil, and eventually ground cover (moss or something). I bought this tiny, hobbit-sized park bench, which will sit right where you see it, but with the patio under it.
So what's left? Tons. Stay tuned.
Hobbit-Sized Roof
The entry way needed a little roof over it, both for practical and aesthetic reasons. The challenge was to get the roof to look rounded, when it actually consists of straight angles.
 I cut the two middle pieces so that they would jut out further than the sides, and gave them a curved line using the jigsaw.
 Here is a top angle view. You cans see the rounded look to the roof line. You can also see more of my cludge waterproofing/drainage work here. The wood piece abutting the pipe is wrapped in black plastic and landscaping fabric, and behind it, laying on the edge of the pipe, is more drainage pipe, wrapped in landscape fabric, to help take water away from this seam. It may have invented my own method, but I know it works, because I ran a hose all over this full blast for 15 minutes, and there are no leaks underneath.
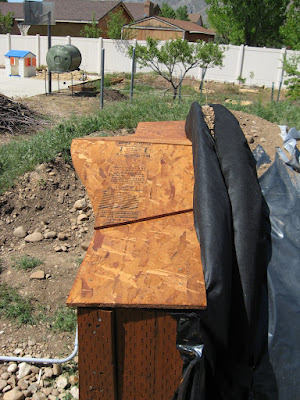 Here is another angle on it. It is starting to look more and more hobbit-like.
 This turned out to be the only shot I took of the shingled roof before I mostly buried it with dirt (see next post). You can see the flashing and the shingles. With the shingles on there, it really gives it more of a rounded look. I later put more flashing along the seam between the roof and the veritcal piece, and took the flashing up and over the lip (top) of that verticle piece. Later, I will paint the flashing with some earthtonee, so it doesn't stand out so much, shining in the sun.
.JPG)
This Hobbit-hole is Wired
 Bilbo and Frodo had their adventures long before electricity was invented. However, since oil lamps and candles are a fire hazard for children, I decided I had better use electric lighting instead. So I ran grey conduit pipe and pulled 12/2 UF Burial Wire through it. (Yep, it was hard to pull it through, especially with turns like this in the pipe. And, yes, I know it is redundant to run wire that is already rated for outdoors (above or below ground) through grey conduit. But I figured that I might as well make it extra safe.) The wire is not yet live, and since this picture was taken, I dug a deep trench to bury it. Finishing the wiring inside will be a later task. I plan to put in four light fixtures (extra-cool, old-fashioned, hobbit-looking ones) and one GFCI outlet (with a nifty, antique-looking faceplate).
Subscribe to:
Comments (Atom)

Custom Search