A hobbit-hole in my backyard? It may sound crazy, but I can tell you that my kids love it. It is the coolest playhouse ever. Plus, they can enjoy the grassy hill for sledding in winter and water sliding in summer. This was all my wife's idea. She dreamt it, and I got to be the one to bring it to reality. I'm not a construction expert; this was a total do-it-yourself job by a complete amateur. It has turned out rather nicely, I think. Here is the story of how it came to be.

Since this is in blog format, the posts are in order from newest to oldest. To read this in chronological order, start with How it all Began and use the "Newer Post" links. Or click on the links under Blog Archive, in order.

Saturday, September 18, 2010

Topsoil on the hobbit-hole


We got a big load of topsoil to cover the hobbit-hole hill, so that it wouldn't be rocky, and so that we could shape the hill a bit more and extend it out a bit at the bottom.  I was going to get some neighbor boys to help, but I got carried away a couple of Saturdays ago and just shoveled it all and raked it all myself--about 10 tons of it.  I subsequently shoveled another five tons from a secondary pile to shape it a bit more.   As you might imagine, the pounds are coming off as I work on this project.  When I started, I was hovering close to 200 lbs.  Now I am down to 179.  (I know I don't look like it in this picture, but my t-shirt is hanging down, making me look fat.)  So, I guess you could say I have discovered a new weight loss secret.

I unfortunately did not get a picture of it with the topsoil completed before I started laying the sod, which I will tell more about in my next post.

Sunday, September 5, 2010

Sprinklers installed


I installed the sprinklers.  Here is a picture of a few of the sprinkler heads during their maiden test.  Next step: topsoil.

Sunday, August 1, 2010

The road goes ever on and on

"I want to see mountains again, Gandalf, mountains! And find some place quiet where I can finish my book."  My sentiments exactly.  Yesterday, I had three things I wanted to accomplish: work on the hobbit-hole, go on a hike, and write in my book.

I live close to mountains, so seeing them is not something I have to wish for, but what I don't do often enough is get up into them.  In fact, sometimes I get so busy with the day to day that I hardly look at them, and I begin to feel like I might as well be living in the Great Plains for all the attention I give them.  I love hiking, but I don't get much of a chance to do it, mainly because I have a hard time convincing the rest of my family that hiking is fun, and because I would feel guilty taking off for hours on end without them.  Yesterday, it had been long enough since the last time we hiked that the kids had forgiven me and forgotten about the tiredness, the sweatiness, and the soreness.  So I managed to coax them all into the car, drive for 45 minutes, and hike a four mile round trip to a waterfall.

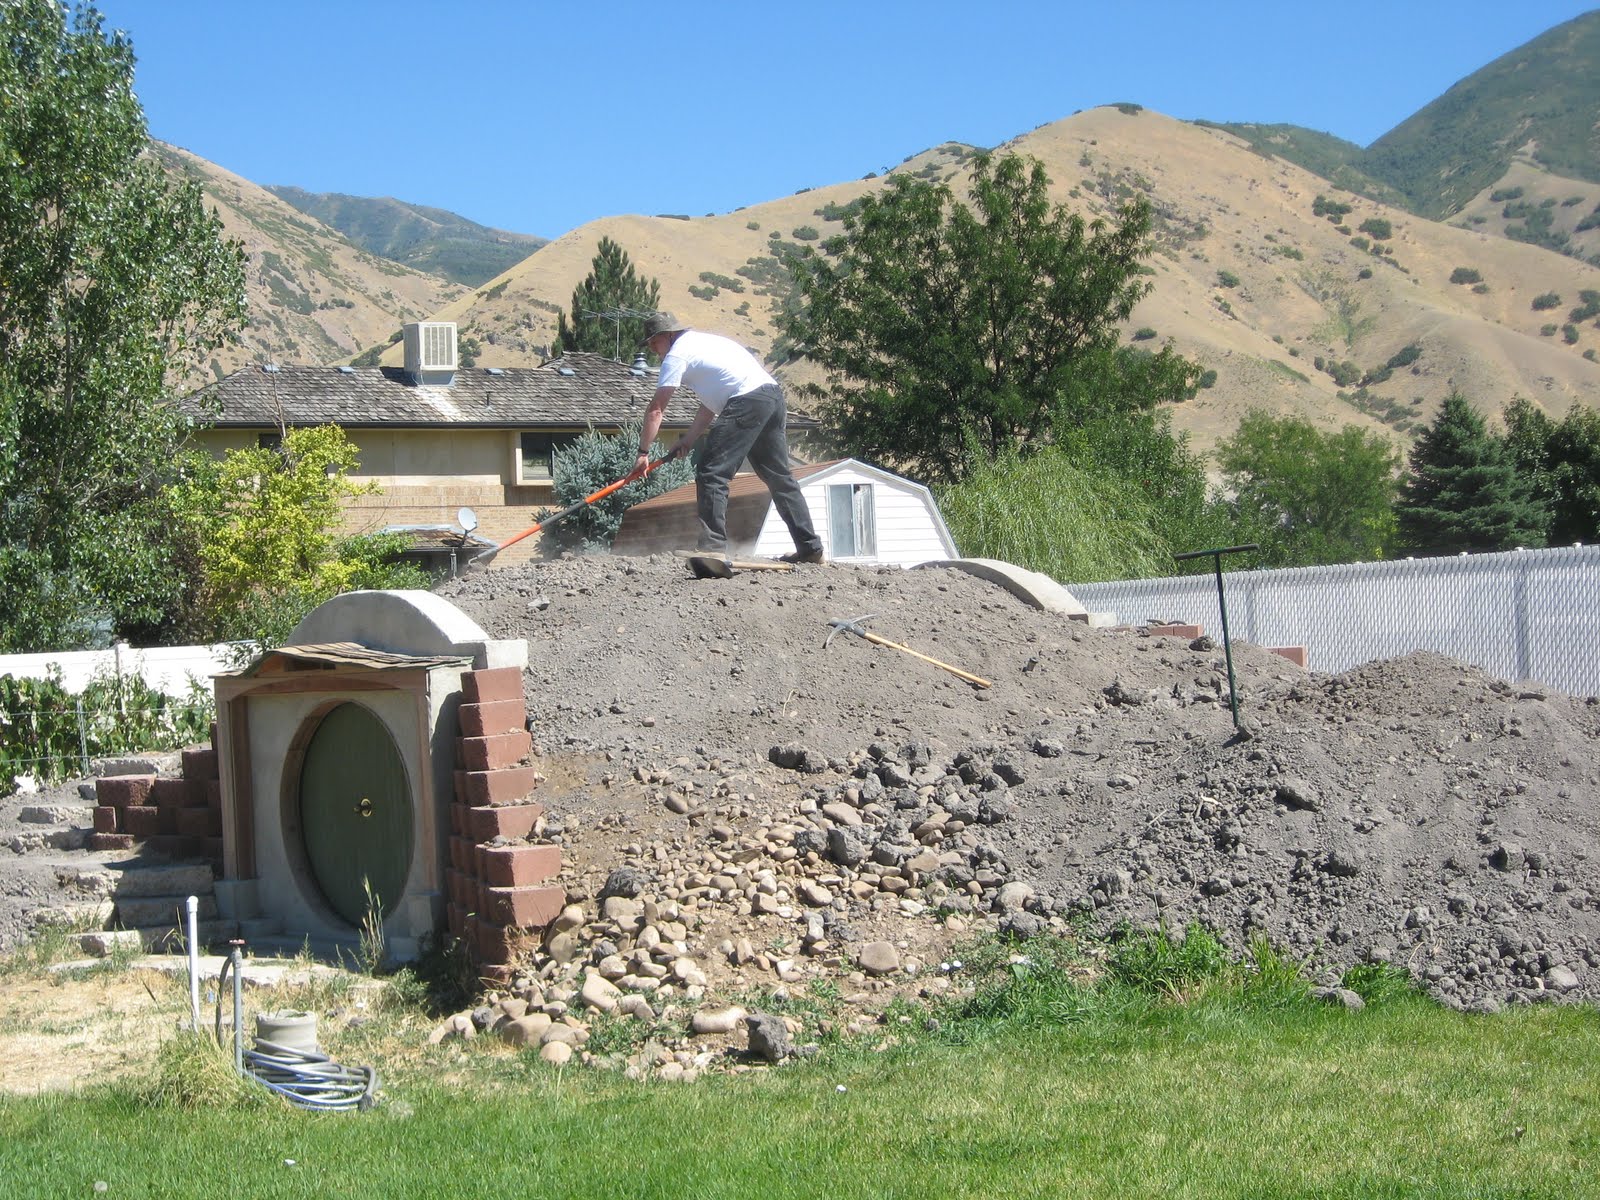
Before we left, I did get a chance to make a little progress on the hobbit-hole interior, getting it prepped to put up the paneling that will cover up the corrugated metal on the inside.  Normally, my habit would be to plug away all afternoon and evening until the sun goes down, but I disciplined myself to stop, for the sake of spending time with my family.  They may have been happier if I had kept working and spared them the hike.

I won't bore you with the details, but suffice it to say, it was the best of times, and it was the worst of times.  The kids had a great time; the kids had a lousy time.  We all had fun; we all thought it was lame.  In the end, we were all tired, sweaty, and sore. But most of us were glad we went, even if we might not choose to do it if we had to start over again.  My wife and I, at least, felt like we had accomplished something significant, and we found ourselves drawing numerous parallels to life in general.  It was character-building, but don't tell the kids that.

For their part, the kids wished we would have hung around at the trail head the entire evening, where a decades-old amphitheater made of stone sits decaying among tall pine trees, reminiscent of an English castle ruin.  The kids played pirates and Romans and medieval knights for an hour before we headed up the trail. And in spite of all the tiredness, and the setting of the sun, they begged to play there again after the hike was done.  We finally got them to agree to come away from there and pile into the car on the promise that we would return in two days.  After all, we have paid the national forest fee for a three-day pass, so we might as well take further advantage of the six dollars.  The hope of a return to their hidden fortress, and the Wendy's value menu on the way home, were enough for them to forgive us again and wash their memories of this latest hiking ordeal.  Still, I'll give it some time before I attempt to drag them on another adventure.

Oh, and my book?  No, I didn't get a chance to work on that yesterday.  What is it about?  That's another story.  Believe it or not, it is not a fantasy.  Well, the idea that I could write and publish a book may be a fantasy.  I should finish the hobbit-hole first.

Tuesday, July 6, 2010

Underhill

Finally, the hobbit-hole has a hill over it! A fellow hobbit came over with his hobbit-sized loader and moved tons over it.  Now it really looks like a hill--albeit a bare, rocky one.  I'm going to get some local boys to come over and help me shape it, clear off the larger rocks, put topsoil over it, and lay sod. Oh yeah, and I need to set up some sprinklers somewhere in there so that I don't just grow a yellow weedpatch. 

Sunday, May 16, 2010

The Maze

Our yard has unlimited fun potential.  Besides the hobbit-hole, the trampoline, the mother-of-all-sandoxes, and the 35 ft. cherry tree, which is great for climbing and affords the "aerial views" of the hobbit-hole, we also have The Maze.  "Dad, when can you mow the lawn?" My daughter asks. "Cause when you do, I want you to make The Maze."  The grass, often neglected due to hobbit business, could really use a trim.  Note to self: Go get gas for the mower.  Later, as I don my boots and my Outback  hat, my son yells, "Hey everybody, Dad's gonna mow!  MA-AZE!"  I usually have ready helpers to clear toys, sticks and other obstacles, plus one or two tag-alongs forming a little train behind me.  Other kids perch on the porch railing or in the cherry tree, waiting for me to mow it high, then mow the twisting, turning pathways low to create The Maze.  When I'm finally finished, they wear themselves out playing tag.  These were taken from the top of the hobbit-hole:


Monday, May 10, 2010

All put together again

Well, the remodel of the front has turned out great.  It is so nice to have everything put back together again, after having it all dug up since last fall.  Now I am finally ready to cover the top with dirt, and start prepping for laying sod.  It will be so nice to look out and see a grassy hill instead of an ugly metal pipe!


Saturday, April 24, 2010

Back to work

Spring has arrived, and so did part of a Saturday without rain!  So I made some progress today.  So far this year, I have only been able to do a few little things, during breaks in the cold and wet weather.  Now I feel like the season of hobbit-hole construction has finally arrived, and I will have many more opportunities to work on it. I hope I won't be too busy.  I also hope that we can continue the pattern of the past week, when it rained during the week and then was sunny for the weekend.  That is the opposite of last year, when it was sunny week after week except weekends.

Today, my focus was on the finishing touches of the exterior.  With both front and back reinforced with concrete retaining walls, I just need to finish the front wall with a nice stucco look over the raw concrete like I did the back, and then add a final moisture barrier for good measure, and then I can bury the thing.

Today, I finished sealing up the seam between the metal pipe and the concrete retaining walls using roofing pitch.  I will add some concrete sealant along the entire surface to be facing the dirt later--hopefully the next chance I get.  Also today, I prepped the remaining surfaces of the front wall that need stuccoing, and stuccoed one of those surfaces.  I have several more to go, but hope to be able to get that all done the next time I work on it, perhaps on a weeknight this coming week.

I can't wait to get the dirt over it, and the sod.  It's going to be so nice to have an attractive green hill out there, instead of an ugly metal pipe and a pile of rocks.

Sunday, February 21, 2010

My daughter's way of encouraging me...

More than a year ago, my daughter painted this picture to inspire me to finish the hobbit-hole. I'm still not finished, but this is the year! The painting has helped to motivate me. It captures the essence of what I am trying to achieve: a peaceful, green, little mound of earth enveloping a special place. Don't you want to open that little green door and peek inside?

Tuesday, January 19, 2010

So I Lied

In my last post, I said winter had put the freeze on any hobbit-hole construction until spring. But, yesterday the temperature rose to a balmy 41 degrees Fahrenheit, and I couldn't hold myself back. I slogged through the melting snow and dismantled the eyesore that was the wooden form used to pour the front retaining wall. It already looks a lot better, though some may beg to differ. Unfortunately, the rough exposed concrete is going to bother me until things dry out and warm up enough to stucco it like I did the rear wall. I also want to put some pitch along the seam between the concrete and the metal pipe, and some concrete sealant where the concrete will touch dirt--as an added measure to block ground water from getting in. Apparently, a huge storm is headed this way, which is dumping tons of rain on L.A., so I don't know if I am going to be able to get to that before Groundhog Day.


Monday, January 11, 2010

Last look before the long winter

I took these pictures just before Thanksgiving. They show the state of the hobbit-hole before the onset of the long winter. After my success with the back wall, I decided that I would pour a similar concrete wall on the front, just behind the facade. The idea is to give the structure on the front the same kind of support and protection from groundwater as I now have on the rear wall.

I took much of the same material that I had used to build the form for the back wall to construct the form for the front wall. You can see here what that form looks like. I had to partially remove the terra-cotta retaining walls and dig away a bunch of dirt to make room for this. It was a big, muddy job for about three days, dismantling, digging, then building the form. Finally, I was able to pour the concrete, which I was able to do just after Thanksgiving, and just before the snow began to fall and the freezing temperatures began. I had to stick a space-heater out in the hobbit-hole in order to prevent the still-wet concrete from freezing.

It has been cold ever since then, and snow that fell before Christmas is still on the ground now. I knew I would have to take a break from construction, but it has been hard to wait, especially when I look out and see the ugly form still there, the retaining bricks stacked haphazardly, and that ugly corrugated metal still exposed. I had hoped to get that covered up with sod this year. Next year it is going to happen!

Here is the best view of it as it looks now (except now it is covered in snow). It has sort of a disemboweled look to it, especially the 2nd and 3rd photos. In the second, I make a cameo apperance. Doh! In the last one, you can see my construction site in all its glory. Usually, I clean up for pictures, but I was going for realism here.

I can't wait to take the form off, finish off the concrete, and put things back together. Then I will finally be ready to bury it.


Sunday, November 15, 2009

Stucco on the Front Wall

Now that the back wall is done, I am returning to the front. I finally have weatherproofed the facade, by stuccoing over the front wall. Now I am debating whether to stain it (and the back wall) a more terra-cotta color, or just leave the grey, which looks rather nice as it is. I also finished under the eaves, and installed air vents.


Saturday, October 10, 2009

Photos of the Back Wall

Finally, I have some new pictures to share. I have been stingy with pictures this year, because I have been doing more deconstructing than building--until now. Unfortunately, my camera is at the shop, so these are taken from my phone.

I must say, I am rather proud of how this wall has turned out. The first two pictures show it in its nearly final form, from a couple of angles. Some of the clear caulk is still drying, and I have a couple of small gaps still to fill, but it is 95% there.


Below is how the wall looked just after removing the concrete form. The window frame was unfinished and the wall was very rough with large gaps and pock marks all over. Using a product called Cement All, I was able to not only fill in the gaps and blemishes, but give the whole wall a stuccoed look that you see in the pictures above.

Here is the wall before I removed the form.
I was able to re-use almost all of the wood from the previous incarnation of the wall to build the form. The form itself was probably harder than anything else to build. It was quite tricky trying to figure out how to do it in such away that would result in an attractive wall, be structurally sound, and also enable me to get the concrete poured in evenly. I had to pour and build the form as I went up. It was actually done in two pours, the first up to about 3 inches above the cinder-block wall, and then the rest a couple of weeks later--this past weekend in fact. The last pour was in two stages while the cement was still wet. First, I poured up to about the height of the window, with the upper part of the form removed. Then I hurried and build the upper part of the form and kept pouring--building the form as I went up, until I poured the last bit through a square hole at the top of the form.


Tuesday, October 6, 2009

Progress

I need to get the pics up, but I am happy to report that I have completed construction of the concrete wall in the back. No more leaks! I feel victorious. I actually poured the wall in two pours, one a few weeks ago, and the second this past weekend. There is literally more than a ton of concrete in the wall, which is at least 9 inches thick, someplaces thicker. I haven't removed the form yet, as I have been waiting for the concrete to harden up. I will get some pictures taken before and after I take the form off. The form itself was quite a job to construct. Luckily, I was able to recycle nearly all of the material from the former war to use in construction of the form.

I nearly had a disaster during the construction. As I was filling the forms with concrete, and the weight increased, part of the form started to bow out, creating a seam from which some concrete was starting to leak out. As the pressure increased, the bowing grew larger. I was afraid the form would collapse and I would have an avalanche of concrete on my hands. What a huge mess that would have been! I'm afraid if that had happened, I may have taken dynamite to the whole project. Luckily, my 8-year-old son alerted me to the problem before it got too bad, and we were able to scramble and shore up the form with a couple of two by fours and a bunch of screws . We were able to close the gap and shore up the form, and only lost a couple of handfuls of concrete. As a kind of a cool side benefit, the forms stayed a little bowed out, making the wall have a bit of a rounded shape. That would be terrible if we were building most any other structure, but for a hobbit-hole, roundness is a good thing!

Monday, July 13, 2009

The Hydra

You know the beast from Greek mythology? The one that, when one head was cut off, would grow back two? Well, that is what this hobbit-hole project was starting to feel like. I reported in my last post that I had fixed the leak. Well that was true, but the next time it rained hard, there were more leaks, and so I have taken drastic measures. I realized that the structure of the back wall was fundamentally flawed. I had built it in haste at the end of last year, trying to get it done before the snows began. I took a couple of shortcuts, hoping that it would work OK and, well, you know the rest. So, I have torn down the back wall. Yep, gone, except for the low cinder-block retaining wall, which I have kept for looks. And its a good thing, too, because the wood structure had begun to rot due to all the leakage that had been happening over the winter and wet spring. If I had let that go, then the whole interior could have been contaminated with mold eventually. As it is, the bad stuff is gone, and the interior is not damaged. The hydro-hydra is vanquished. Well, sort of. Instead of a leaky wall, I now have no wall.

My new plan? I'm not going to mess around this time. I'm going to use concrete--just like they usually do when dealing with culvert pipes under highways and such. I'm building a form for a 10-inch thick concrete retaining wall to cover the back wall and extend beyond it to hold up the future hill around it. The form will include an opening for the window and ventilation. This will be reinforced with some rebar. Yes, it will be ugly and un-hobbitlike at first, but don't worry, I will make it round on top and cover it up with a nice façade so it won't look like a culvert.

If only I had thought of this method in the first place! Oh well. Live and learn. That's what you get when you are an amateur taking on a job like this. Not to worry, though. After all, Bilbo and Frodo were amateurs too, when they first set out on their adventures.
Custom Search